Post by Apoc on Dec 28, 2005 9:29:52 GMT 5
NOTE: This tutorial does not have to just be used with fractals, it can be used for pretty much any textured picture that you want to make a brush. with that said, lets continue!
Part 1: Creating the Brush Texture
first, you need some fractal flames. I would suggest using either [ftp]http://www.apophysis.org/Apo202.exe[/ftp] (Apophysis) or [ftp]http://www.btinternet.com/~ndesprez/download/chaoscope_manual_fr_0_2_1.zip[/ftp] Chaoscope to make them, i will demonstrate with apophysis.
Now i will not go through the fractal making process, just show you how to get the brush from an image.
1.) Get the fractal you want to use from apophysis. If you have never the program before, you can edit the batch flames in various ways, but when your ready to make it look really good, go to Flame>Render to Disk. Pick where you want it saved to and what other settings you want. I would recommend 1024x768, as it makes big but detailed brushes, but use what you want. Make as many fractals as you feel like having in your brush pack.
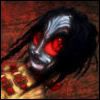
2.) Now open up photoshop, and open up one of the fractals you plan on turning into a brush. Mess around with the brightness and contrast until you get a fair amount of color, but without alot of crowding. My original flame went from this-

-to this-

i know it looks a little ugly, but thats alright for now.
3.) Make sure you have the layer that had the brightness and contrast done to it selected, and you are also using the marquee tool. Go to the channels tab
 in the lower right corner of the default workspace
and ctrl+shift click it a few times to select just the color. Click only once or twice to select just a little bit, but as you click more it selects more of the flame. Dont over do it, I clicked 5 times and selected this much of the flame

4.) Now with all of that selected, hit ctrl+C to copy the layer, switch back to the layers tab, and hit ctrl+V to paste it as a new layer.
5.) select the new layer that you just pasted, should be alot of transparency around a bit of fractalage, and hit ctrl+u. Pull the bottom slider, "lightness" all the way to the left, making the flame completely black.
Right now you should be about here:

6.) Now for some touchups. Take the circle marquee tool, and select the main part of your flame. Then select the "add to selection" option for the marquee:

and select some of the more prominent parts of the flame, but not all of it. My final selection is exactly where the red outline is.

7.) Right click the flame layer with the marquee tool (while still having the parts you want to be in the brush selected) and click "Feather". Type in 40 for the feather radius.
8.) Next go to Select>Inverse, or ctrl+shift+I and hit delete 5 or 6 times, to make sure you have a nice smooth fade to nothing from the inside of the brush to the outside.
my brush ended up like this:

9.) Open any brush set you have, preferably one with very few brushes. I will use my own personal brush pack. Right click on each brush and select "delete brush", then hit "OK". You should have an empty brush pack right now.
10.) Make sure you have the black fractal layer selected, and go to Edit>Define Brush. Now select the brush tool, and go to change your brush. You should have one brush there.
CONGRATULATIONS! You just made your first fractal brush! You can use this tutorial to go and make a complete brush set.
11.) After you make as many brushes as you want to have in the pack, you can save it as a brush set.
1.) Hit the dropdown brush tab
2.) Hit the over arrow
3.) Hit Save Brushes
4.) Save them somewhere on your computer with whatever name you want!
APOCS FRACTAL BRUSH TUTORIAL
Part 1: Creating the Brush Texture
first, you need some fractal flames. I would suggest using either [ftp]http://www.apophysis.org/Apo202.exe[/ftp] (Apophysis) or [ftp]http://www.btinternet.com/~ndesprez/download/chaoscope_manual_fr_0_2_1.zip[/ftp] Chaoscope to make them, i will demonstrate with apophysis.
Now i will not go through the fractal making process, just show you how to get the brush from an image.
1.) Get the fractal you want to use from apophysis. If you have never the program before, you can edit the batch flames in various ways, but when your ready to make it look really good, go to Flame>Render to Disk. Pick where you want it saved to and what other settings you want. I would recommend 1024x768, as it makes big but detailed brushes, but use what you want. Make as many fractals as you feel like having in your brush pack.
2.) Now open up photoshop, and open up one of the fractals you plan on turning into a brush. Mess around with the brightness and contrast until you get a fair amount of color, but without alot of crowding. My original flame went from this-
-to this-
i know it looks a little ugly, but thats alright for now.
3.) Make sure you have the layer that had the brightness and contrast done to it selected, and you are also using the marquee tool. Go to the channels tab
in the lower right corner of the default workspaceand ctrl+shift click it a few times to select just the color. Click only once or twice to select just a little bit, but as you click more it selects more of the flame. Dont over do it, I clicked 5 times and selected this much of the flame
4.) Now with all of that selected, hit ctrl+C to copy the layer, switch back to the layers tab, and hit ctrl+V to paste it as a new layer.
5.) select the new layer that you just pasted, should be alot of transparency around a bit of fractalage, and hit ctrl+u. Pull the bottom slider, "lightness" all the way to the left, making the flame completely black.
Right now you should be about here:
6.) Now for some touchups. Take the circle marquee tool, and select the main part of your flame. Then select the "add to selection" option for the marquee:
and select some of the more prominent parts of the flame, but not all of it. My final selection is exactly where the red outline is.
7.) Right click the flame layer with the marquee tool (while still having the parts you want to be in the brush selected) and click "Feather". Type in 40 for the feather radius.
8.) Next go to Select>Inverse, or ctrl+shift+I and hit delete 5 or 6 times, to make sure you have a nice smooth fade to nothing from the inside of the brush to the outside.
my brush ended up like this:
Part 2: Making it a Useable Brush
9.) Open any brush set you have, preferably one with very few brushes. I will use my own personal brush pack. Right click on each brush and select "delete brush", then hit "OK". You should have an empty brush pack right now.
10.) Make sure you have the black fractal layer selected, and go to Edit>Define Brush. Now select the brush tool, and go to change your brush. You should have one brush there.
CONGRATULATIONS! You just made your first fractal brush! You can use this tutorial to go and make a complete brush set.
11.) After you make as many brushes as you want to have in the pack, you can save it as a brush set.
1.) Hit the dropdown brush tab
2.) Hit the over arrow
3.) Hit Save Brushes
4.) Save them somewhere on your computer with whatever name you want!